Tuesday, September 17, 2013

Peanut Butter Cookie Dough Dip

This recipe put me in my place. It taught me, again, to never judge a book by its cover.  I've seen dessert dip recipes all over Pinterest and blogs lately.  I've always thought that they sounded completely gross. I'm not even sure why.  Maybe I didn't think I liked raw cookie dough enough.  Whatever the reason, I was so wrong.

My Husband made this one day and I was very skeptical.  I told him before even trying any, "you're going to end up eating that all yourself."  He kept reassuring me I'd like it.  "Nope, I don't like peanut butter cups" I'd say. "Just try it" he said. "I probably won't like it." I'd say.

Well, guess who ate most of it? This girl.

Much to my surprise, it was good! I honestly don't like peanut butter cups so I would scoop around them just getting the cookie dough & some chocolate chips.  Yum!

Next up, I'd like to try a brownie batter dip or cake batter dip.  I'm still skeptical of a sugar cookie dip only because I imagine it to be too sweet and sugary.  But, I need to remind myself not to judge a book by its cover, or a dip by its peanut butter cups!

Here's a great dip idea, pumpkin dip, for any of you Fall lovers like me!


Peanut Butter Cookie Dough Dip
Recipe from: Shugary Sweets

Ingredients:
1/2 cup unsalted butter
1/2 cup light brown sugar (all we had was dark)
1/4 cup creamy peanut butter
8oz cream cheese
3/4 cup powdered sugar
1 tsp vanilla extract
1/2 cup semi-sweet chocolate chips
8 oz package Reese's peanut butter cup minis OR 1 1/2 cups chopped Reeses cups

Directions:
In a small saucepan, melt the butter over medium heat.  Whisk in the sugar, heating until all of the sugar dissolves.  Remove from the heat immediately and add the vanilla.  Allow this to cool to room temperature. If it isn't completely cooled, it will affect the end result of the dip.

In a large mixing bowl, beat the cream cheese, powdered sugar and peanut butter until creamy, about 3-4 minutes.  With the mixer on low, add in the brown sugar mixture that has now been cooled to room temperature. Mix until combined. Fold in the chocolate chips and Reese's.  Serve immediately or store in refrigerator until ready to serve.  We enjoyed this with graham crackers.  Animal crackers would also be good! I wasn't a fan of eating it with pretzels. But, give that a try if you think it sounds good!

Monday, September 16, 2013

Blueberry Stuffed French Toast

My Husband's hours changed at the beginning of this Summer and he's now home on the weekends more often.  He usually had to work every other weekend.  Now, he works about every fifth weekend and only has to go IN the office for a few hours and is able to work from home on Sundays.

I know I've talked about having Saturday breakfasts before (here and here) but I really do enjoy having a more involved breakfast on weekends. Whenever we visit my Parents, we usually have a more involved breakfast, too.  More involved doesn't always have to mean time consuming or hard.  To me, a more involved recipe just means that it's something more than you'd make on the weekday mornings when you're rushing off to work, getting kids ready for school, heading to your next class, etc.  It's something more than a breakfast bar or bowl of cereal.  It's something that you have to sit down and enjoy, not something you can eat while waiting for your bus or carpool. 

This recipe was very good! I didn't actually find the recipe, my Husband was looking up the recipe while I was in the kitchen. So, I can't give proper credit.  Please let me know if this sounds like your recipe and I will give you credit! 

I've never made stuffed french toast before, but now that I've been looking at recipes I don't think I did it correctly.  However, I don't really care because these were so yummy.  I really should make them again this weekend. I'm sure my little one would love some blueberries!

Blueberry Stuffed French Toast
Recipe from: Internet search, specific recipe unknown

Ingredients:
Slices of bread
2 eggs, lightly whisked in a bowl
pinch of cinnamon
pinch of sugar
1 tsp vanilla 
Softened cream cheese
1 cup of blueberries
a couple tablespoons of powdered sugar

Directions:
Add the pinch of sugar and the pinch of cinnamon to the egg in a small bowl. With a hand mixer, mix the powdered sugar with the cream cheese, gently add the vanilla and mix well.  Mix in as much or as little powdered sugar as you'd like, depending on how sweet you'd like it. You might want more than a couple tablespoons, you might want less, it's completely up to you. 

Just as if you were making regular, un-stuffed french toast, dip your bread in your lightly beaten egg mixture. I cooked all of my pieces of bread and then set them aside. 

Take a spoonful of the cream cheese mixture and spread on top of one piece of bread.  Top with a few blueberries (again, you can choose more or less depending on your preferences).  Top that with another slice of bread. Gently press down.  

Place the sandwich on your griddle and cook until warmed through and the cream cheese mixture softens even more. 

Serve warm with some additional powdered sugar sprinkled on the top. 

Some of the other recipes I found said to make the complete sandwich first and then grill it.  Not to grill the bread and then grill it again with the filling. 

Friday, June 7, 2013

Chicken Tamale Pie

Here's another recipe from the Recipe Swap that I participate in. I am really starting to love these swaps. They get me to make new recipes that I otherwise wouldn't make. They help keep me out of the meal planning slump that I'm often in. I was assigned Heather's blog again, this time with a Mexican theme and the recipe I was assigned was this chicken tamale pie.  I was intrigued by it, not knowing really what to expect.
Speaking of meal planning, let me come right out and say that I had dreams of what maternity leave would be like. I envisioned days of light cleaning, daily showers, sleeping when the baby slept, meal plans, dinner prepped each night before my Husband got home. It was going to be glorious.

I didn't realize I would live in a "what day/week/month is it?" world, I didn't realize that showering every other day would seem luxurious. I didn't think my Baby would take only 30 minute naps (yes, seriously.), I didn't realize that despite being home all day, I wouldn't have a stinking clue what was for dinner when my Husband came home at 4:00pm. Yikes.

If you're a first-time Mom like me who is living in a crazy world, make this meal. Yes, I'm serious.  It's easy, peasy. You could make it with a baby on your hip, while warming up a bottle AND checking out Instagram. Seriously, easy. I boiled and shredded the chicken the day before to help with my prep time. Best idea ever! Better yet, use leftover shredded chicken! Or heck, even use some lean ground beef. I bet that'd be tasty!

Both Heather and Nicole made this recipe in a pie plate.  That seemed really messy to me and I wanted something with ease so I made it in a 9x13 pan. Thank goodness, too. I was able to show some self control and not eat the whole pan! A pie plate may not have survived my hunger.
Chicken Tamale Pie
Recipe adapted from: Hezzi-D's Books and Cooks

Ingredients:
1/3 cup milk
1 egg
1/2 packet taco seasoning (I had leftovers from a different recipe)
couple shakes of crushed red pepper
1 can of cream style corn
1 box of Jiffy corn muffin mix
1 (10oz) can of enchilada sauce
2 cups of cooked chicken breast, shredded
1/2 cup shredded Mexican style cheese
2 tsp cilantro, chopped 

Preheat your oven to 400*.  Spray a baking dish with non-stick cooking spray. In a medium sized bowl, mix the milk, egg, half of the taco seasoning, crushed red pepper, cream style corn and corn muffin mix together, just until moist. Pour into your baking dish. Bake for approximately 20 minutes until light golden brown. While that is baking, mix your chicken with the rest of your taco seasoning.

Take out of the oven and while still warm, using a fork, pierce the entire surface with a fork. Pour all of the enchilada sauce over the corn muffin mixture. Add your shredded chicken, then the cheese. Bake for about 12 minutes until the cheese is melted. Let sit for about 5 minutes and serve. 

See? Easy! 

Wednesday, May 29, 2013

Cream Cheese Rice

One of my favorite cooking blogs is Good Thymes and Good Food. Rachel has many great recipes that are easy for busy Moms, nutritious and delicious!

When I made my Chicken Wellington, I wanted a side dish to go with it. I wanted something other than a salad or frozen veggies or another 'typical' side dish. Something different but yet easy since I didn't really know how difficult the wellington recipe would be. I found the perfect recipe when I came across her Mexican Cream Cheese Rice.

At first I thought about putting a mexican spin on the wellington using taco seasoning instead of the Italian seasonings so that I could make this rice exactly.  I finally settled on adapting this rice recipe to be a more basic side dish without the mexican theme.

It came out perfectly and was really, really good. I'll definitely make this again & again, perhaps changing it up a little bit each time I make it!

ream Cheese Rice with corn and peas
Recipe adapted from: Good Thymes and Good Food

Ingredients:
2 cups chicken stock
1 cup uncooked instant rice
3 ounces of cream cheese, cubed
1 cup sharp cheddar cheese, shredded
1 can of peas, drained
1 can of corn, drained
1 can of mushrooms, drained
1/2 of a medium onion, chopped
salt & pepper, to taste

In a large pot, bring the chicken stock to a boil and add the rice. Stir, cover, reduce the heat to low and cook for twenty minutes.  Preheat the oven to 350* and spray a small baking dish with cooking spray. 

Once the rice is cooked, add the cubes of cream cheese and let melt. Add the corn, peas, mushrooms & onions. Add salt & pepper to taste.

Transfer the rice to the baking dish. Bake for 20-25 minutes until the cheese bubbles and is lightly browned.

Tuesday, May 28, 2013

Chicken Wellington


I finally participated in this month's What's Baking theme.  I've been getting the emails for awhile now and finally found the time to participate.  The theme this month was puff pastry and was hosted by Cara at The Boys Made Me Do It.  I've never worked with puff pastry before. I've had it a few times, mostly as an appetizer such as Brie En Croute.

This recipe was really good. I've never had beef wellington so I wasn't really sure what to expect but my Husband and I both loved it. It came together pretty quickly, was delicious & we had all of the ingredients on hand which always makes me appreciate a recipe even more!
I would definitely make this again but with a couple changes.  The first being that I would shred the chicken and mix the mushroom, onions and cream cheese mixture with the shredded chicken. I know that it wouldn't be a wellington with those changes and more of a 'stuffed' puff pastry but I think that it would be a better final product. The way the recipe is now, the bottom puff pastry gets a bit soggy because of the onions and mushrooms as the bottom layer and with the cream cheese on the top, between the chicken and puff pastry, makes it a little hard to cut through because it created a barrier between the chicken and the puff pastry, so the pastry didn't really stick to the chicken like I think it should have. The second change I would make is that I might make my own puff pastry! I was surprised at the price of puff pastry in the grocery store. For a package (two sheets), it was around $3.50 I think. Annie's Eats has a recipe for homemade puff pastry that looks intimidating but as I've learned with other recipes I've made, you just have to try!
After trying this recipe, I definitely want to try a beef wellington, I think we would both really enjoy that as well.

Chicken Wellington
Recipe slightly adapted from: Pepperidge Farms

Ingredients
4 skinless, boneless chicken breasts
2 tblsp butter
3/4 cup sliced mushrooms (I used canned)
1/2 cup onion, chopped
1/3 of an 8 oz block of cream cheese
1 tblsp Dijon mustard
all purpose flour, for rolling out the puff pastry
1 sheet of puff pastry, thawed
1 tsp Italian seasoning, divided
1/8 tsp black pepper
sprinkle of salt

Directions:
Heat the oven to 400*.  Lightly grease a baking sheet with cooking spray. Season both sides of your chicken with the salt, pepper & a 1/2 tsp Italian seasonings. Heat 1 tablespoon of the butter in a skillet over medium heat. Add the chicken and cook until golden brown on both sides, about 5 minutes each side. Remove the chicken from the skillet & refrigerate for about 15 minutes.

Melt the other tablespoon of butter in the skillet. Add the onions and mushrooms and cook until tender and the liquid has evaporated. Add the other 1/2 tsp Italian seasonings.

In a small bowl, combine the cream cheese and Dijon mustard. Mix together until thoroughly combined.

Sprinkle your work surface with flour. Roll out the puff pastry in to a 14" square. Cut into 4 equally sized squares.

Spoon a tablespoon of the mushroom and onion mixture on to the puff pastry. Top with one chicken breast.  Top the chicken breast with one tablespoon of the cream cheese mixture. Fold the corners of the pastries up and over the chicken breast. Place the pastries seam side down on the baking sheet. Lightly spray each pastry bundle with cooking spray.

Bake for 25 minutes until the pastries are golden brown.

Friday, May 24, 2013

Recipe Swap: Crispy Baked Zucchini Fries with Sriracha Lime Mayo

{photo was lost in a blog email address transition 1.24.14}

I belong on a cooking forum and have been there for about a year or so. I enjoy having a cooking blog although it's really not much compared to other blogs. I like to be in the kitchen and I'm excited to make Lauren's baby food in the next month or so.

One thing I love about the cooking forum is the group participation. There are recipe swaps a couple times a month. I have participated in these recipe swaps once before.  I really love the idea of the swaps.  Bloggers are "assigned" another blog A Taste of Home Cooking hosts these blogs each month and provides us with the link below so that you can check out all of the recipes.

I was given Hezzi-D's Books and Cooks as my blog for this swap. I seriously waited until the very last minute to make the recipe because I just could not decide what I wanted to make. I browsed through her desserts, appetizers, main dishes, chicken dishes, beef dishes etc.  I finally had to tell my Husband to browse her blog and pick a recipe. I knew he would pick one, without hesitating like I was doing.

Lately, my Husband is watching what he eats, counting calories, limiting carbs and trying to get more exercise in. So far, it's working! He's lost 9lbs.  While it makes for a challenging time when trying to meal plan, I'm proud of him for sticking with it.

This recipe is a great way to sneak some veggies in to your (or your kids'!) diet.  I really enjoy zucchini (tell that to my 10yr old self!) and usually only make it in a stir fry or on kabobs. This really didn't take any time at all to prepare and could easily be made for a crowd or for one. Make as little or as much as you like!

What I loved most about these is that I could definitely see myself replacing regular, potato french fries with these. They have a slight crunch to them, but the inside is soft, similar to the soft, potato inside of a regular french fry.

Crispy Baked Zucchini Fries with Sriracha Lime Mayo
Recipe adapted from: Hezzi-D's Books and Cooks 

Ingredients: 
4 heaping teaspoons of flour
2 eggs, lightly beaten
1/2 cup breadcrumbs
1/4 cup grated parmesan cheese
1 tsp salt
1 tsp black pepper
1/2 tsp garlic powder
3 medium zucchinis

Sriracha Sauce Ingredients: 
3 tablespoons mayo
1 1/2 tsp Sriracha
1 tsp lime juice
1/2 tsp salt
1/2 tsp black pepper

Directions: 

Preheat oven to 425. Cover a baking sheet with foil and lightly spray with cooking spray. Cut the ends of each zucchini and cut the zucchinis into "fry" shapes. You could even cut them in discs if you wanted zucchini chips, I suppose. 

 You'll want to set up a small station. The beaten eggs should be in one shallow dish and in another shallow dish, combine the breadcrumbs, parmesan cheese, salt, pepper and garlic powder. Gently mix together with a fork. 

Put the 4 teaspoons of flour into a ziploc bag. Place all of your cut zucchini in the bag. Zip the bag shut and gently shake the bag until all pieces are coated. 

Next, dip the floured zucchini pieces into the beaten egg, coating all sides. Then, you'll put them into the breadcrumb mixture and again, be sure to coat all sides. 

Place the breaded pieces onto your prepared cookie sheet.  Bake for about 25 minutes until they're golden brown and crispy. 

While the fries cook, whisk together the ingredients for the sriracha mayo. I chilled mine while the fries continued to cook. 

Serve the fries warm with the dipping sauce. Yum! 

Tuesday, May 21, 2013

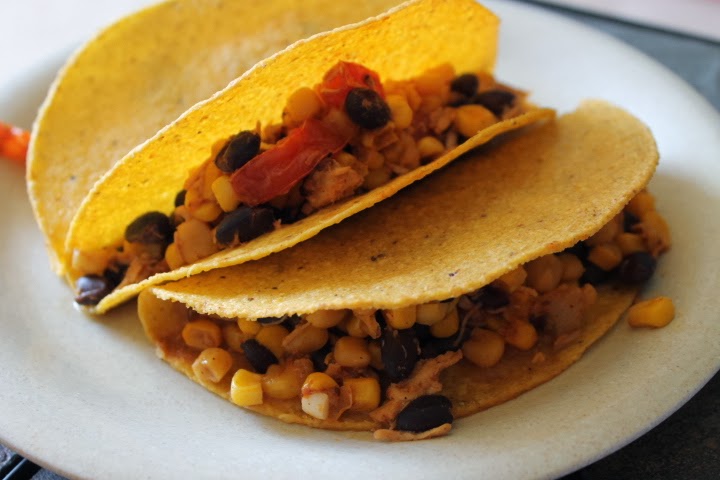
Chicken Tacos

This isn't your typical chicken taco recipe.  Have you ever had the Dorito Taco Salad recipe? I was thinking about that when I was making this recipe, but using ingredients that I had on hand. It didn't turn out quite like I had hoped, but it did turn out and it was quite tasty!

I don't even have exact measurements because I just kind of threw it together.  I ate mine with some shredded lettuce the first night, but then the next day, I made them as tacos for lunch.

Chicken Tacos
Recipe from: Amy's Kitchen Creations original recipe

Ingredients:
Cooked and shredded chicken breasts
15-30oz Black beans, rinsed and drained
15-30oz Canned corn, drained
~2 tblsp Catalina dressing, to drizzle on before serving
Roma Tomatoes, cut up
A couple tablespoons of taco seasonings

Toppings of your choice:
Sour cream
Guacamole
Shredded lettuce
Shredded cheese
Hard taco shells
Soft flour or corn tortillas for soft tacos 

Directions:
After cooking & shredding the chicken breast, sprinkle the taco seasoning onto the chicken while the chicken is still warm. {Have you ever used your kitchenaid mixer to shred chicken? It's genius!} 

Then, mix together the shredded chicken, corn, black beans. Add your dressing and combine. Add more or less dressing per your preference. Top with some toppings of your choice. 

See, it's easy! I feel a little silly for even posting a recipe because it's so easy. 

Tuesday, April 16, 2013

Blueberry Swirl Cheesecake Bars


When we have Holiday dinners at my Husband's Grandparent's house, I'm always asked to bring dessert.  I love it because I can try out new recipes and can always get some great feedback. Not to mention, it takes the guesswork out of wondering what to bring to a family gathering. 


I knew I wanted to bring a cheesecake because I had a lot of cream cheese in the refrigerator. I have never made a cheesecake before which shocks me now that I think of it.  

This recipe was so easy to make and it received great feedback! We came home with about 3/4 of the pan left so I sent most all of it to work with Matt. One of his coworkers shared some with his Wife when he got home and his Wife questioned where he stopped after work to pick up some cheesecake. 

The only thing that I would change is that I baked the crust before putting the cheesecake filling layer in. After thinking about it, I probably didn't have to and that's probably why the crust separated a little bit from the cheesecake layer when you would cut into it with your fork. I think if you only baked the crust the one time once you had the filling poured on top, it would be much better. 


Blueberry Swirl Cheesecake Bars
Cheesecake recipe adapted from: Taste of Home
Graham cracker crust recipe adapted from: All Recipes

Ingredients for the crust:
3 cups graham cracker crumbs
2/3 cup white sugar
12 tablespoons of melted butter

Ingredients for the cheesecake layer:
4 packages cream cheese, softened
1 cup white sugar
1/2 tsp lemon extract
4 eggs, lightly beaten
1 can (21oz) blueberry pie filling

Directions for the crust:
1. Mix together the crumbs, sugar and butter until well blended. Press mixture into 9x13 pan.**
2. Bake at 375 for 7 minutes. 

**{If you're using this crust in a recipe that calls for the finished product to be baked, you could probably hold off on baking the crust separately. If you're making a pudding pie or something that does not need to be baked, you probably will want to follow step 2.}

Directions for the cheesecake layer:
1. Mix the cream cheese, sugar and lemon extract until smooth.
2. Add the eggs and beat until just combined.
3. Pour into the graham cracker crust
4. Drop blueberry pie filling onto cheesecake layer by tablespoons.
5. Using a butter knife, swirl the filling throughout the cheesecake layer. Dropping more filling as needed.
6. Bake at 350 for 35 minutes or until center is almost set.
7. Cool on a wire rack for 1 hour and then refrigerator for at least 2 hours.
8. Top with remaining pie filling, if desired at the time of serving.

Wednesday, January 16, 2013

Pea Salad

I'd never had pea salad until I met Matt's family.  His Grandma serves it at some of the family Holidays.  There isn't much of a recipe for it and it's really not much of a dish but it is pretty tasty. Plus, you're getting a serving of veggies, right? :-)

I wasn't there for the year that Matt's Grandma served them frozen pea salad, but they definitely reminisce about it each time we have pea salad. Oops!! 


Pea Salad
Recipe from: Family Recipe

Ingredients:
Bag of frozen peas, thawed
Mayonnaise
Roasted peanuts for topping, optional
Salt & pepper, to taste

There isn't much of a recipe as I said.  You use as much or as little mayonnaise as you'd like.  Mix together the mayonnaise and peas. Top with the peanuts.  Serve.

You could prepare this a day ahead of time, keeping the peas frozen and allowing them to thaw overnight in the refrigerator.  Maybe that's how she accidentally served them frozen pea salad?!  If you use this method, make sure your peas are thawed by taking a little taste test before serving!

Monday, January 14, 2013

Kitchen Tip: Cooking plain Chicken Breasts

In my opinion, there is nothing worse than a dry chicken breast. This is my favorite way to cook a plain chicken breast.  It's easy, hands-off and always produces great results! I really think the key here is that the chicken needs to be completely thawed.  It might work just as well with frozen chicken breasts, I'm just not sure, I haven't tried it yet.

The other night I threw the chicken breasts into the oven to cook up quick so that I could add them to the pasta.  In 30 minutes, I had juicy, thoroughly cooked chicken breasts.

You could even cook up your chicken ahead of time if you're needing chicken for a cold pasta or cold salad.  Cook the chicken, let it cool and cut/dice as needed.  You'll still have flavorful, moist chicken! This would work great on a busy weeknight, too.  While your chicken is cooking, prepare some veggies or a salad for a quick and delicious dinner.


Directions:
Preheat your oven to 400*.  Cover a rimmed baking sheet with two sheets of foil.  Place your chicken breasts on the foil lined baking sheet.  Sprinkle with whatever seasonings you desire on your chicken.  Place a piece of foil over the top of the breasts, crimping around the edges of the pan so that you have created a completely covered baking sheet.  Put the baking sheet in the oven for 30 minutes.

After the 30 minutes, check to make sure your chicken is done.  If needed, cover with the foil again and cook an additional 15-20 minutes or however long you need until it's done.